 By Tim Cole
Not all of us will want to take a telescope to image June's Transit of Venus. A telescope can be a nuisance to lug around, particularly if you're flying to a good location. As Steven van Roode showed in his March 12 blogpost Shooting the Sun, you can get excellent solar photographs with a DSLR and medium telephoto lens. You can also get good results with less sophisticated cameras.
--> Part 1: Building a solar filter adapter
--> Part 2: Catching solar photons
--> Part 3: Processing solar images
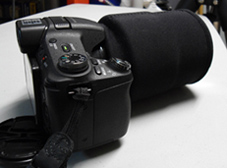
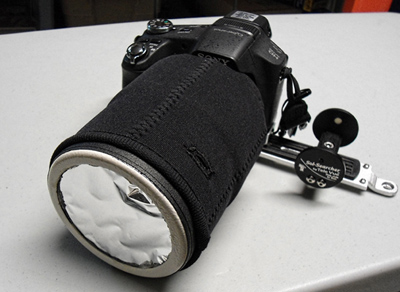
Here's a typical middle-of-the line digital camera. As with most modern cameras, it has an almost bewildering array of features. For solar imaging, its most important features are optical zoom to 30-power and manual exposure control. The problem is attaching a solar filter to a lens that retracts into a close-fitting housing. Fortunately, it's easy to build a simple adapter from inexpensive parts.


Part 1: Building a solar filter adapter
My requirements for a solar filter adapter were straightforward. It had to:
- Secure the solar filter to the camera
- Provide a light baffle to minimize stray light reflecting from the back of the solar filter
- Place the filter close to the front of the camera lens at maximum extension.
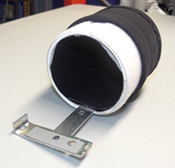
A 4-inch diameter ABS pipe coupler makes a sturdy baffle tube. The camera bracket is made from a carpenter's T-brace, drilled to match the position of the camera's tripod screw socket. With the bracket attached to the camera body, it's easy to slide the baffle tube to the optimum position and mark the places to drill screw holes. Black flocking material applied to the baffle tube's inner surface does a very effective job of eliminating internal reflections.
Once the filter tube is assembled, the solar filter can be bonded to the baffle tube with silicone adhesive.
These two photos show the completed solar filter and adapter. The photo
on right shows the camera side of the baffle tube, with the cover rolled
back to show the camera bracket.
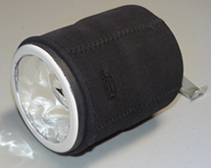
The fabric cover makes a pliable skirt that covers the inevitable gap between the camera body and the baffle tube. I'd thought of making the cover from felt, but my local hardware store had a small trash bag made to fit into a car's cup holder. It didn't seem like it would be a good trash bag, but it made a great cover.
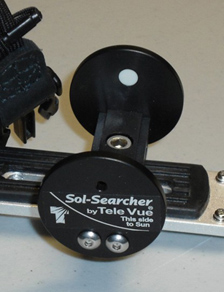
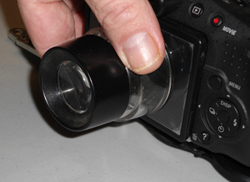
Aiming a camera at the sun can be a remarkably frustrating exercise, so I decided to add a sun finder. The bracket came from a cheap flash holder I'd found in a used camera store. I happened to have a sun finder in my gadget box, but they're not hard to make. This particular sun finder uses a pin-hole to project an image of the sun onto a disc of translucent plastic at the back of the finder.
Part 2: Catching solar photons
There are always a few challenges to using an ordinary digital camera for astrophotography. When the Sun is the target, the challenges can be a bit different from those of nighttime photography.
Preparing for solar imaging
One challenge that can plague the novice solar photographer is simply
being out in the Sun. When you're paying attention to the camera, it's
very easy to end up dehydrated and sunburned. Years ago, I learned that
the hard way. Now I wear a broad-brimmed hat that keeps my neck, ears,
and bald spot shielded. Don't forget sunblock, and don't forget to keep
drinking water.
Be careful with sunblock and your solar-filtered camera. Almost any
sunblock can leave persistent smears on lens surfaces and solar filters,
and cleaning solar film is tedious. Some types of sunblock,
particularly brands that include insect repellants, can damage optical
coatings.
Mounting the camera
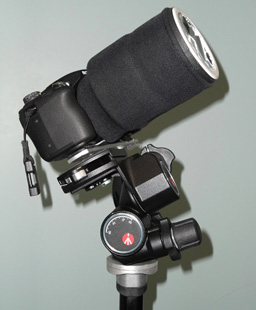
A tripod is almost indispensable for solar photography. The photo on the
left shows my camera on a lightweight geared head. The camera is
attached backwards, which lets it point straight up. Most photographic
equipment isn't designed for astrophotography, so be prepared to be a
bit unconventional.
Fortunately, it isn't necessary to buy an expensive tripod and head. The
right-hand photo shows my camera on a good quality entry-level tripod.
The video-style handgrip makes aiming on the Sun quite easy, but panning
to keep the Sun in view can be trickier than it might seem. It's easy
to overshoot and lose the Sun completely.

Whatever tripod you plan to use, take the time to practice with it. Even simple equipment can have odd quirks. A transit of Venus is no time to discover a new one.
Getting the exposure right
White-light solar images don't reveal much detail. This sets up the next
challenge: getting the image well exposed and well focused.
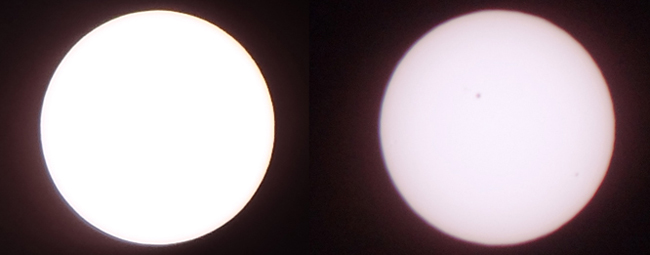
Compare these two unprocessed solar images. The image on the right is fairly well exposed. There are at least two modest sunspots visible, but more importantly, the limb is noticeably darker than the central region. The overexposed image on the left shows a uniform white disc with an unnaturally sharp limb.
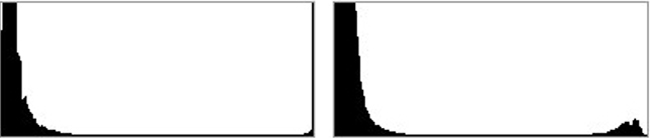
Both images have histograms with small ranges of pixel values in the shadows. This shows that the backgrounds aren't uniformly black. The major difference is in the highlights. The histogram for the left-hand image shows a narrow spike at the far right of the graph. This confirms that the image is overexposed, and there is no detail in the Sun's disc.
In the right-hand histogram, there's a broad peak to the right of the
graph. The far edge of the peak just barely reaches the maximum pixel
level, which shows that the exposure is reasonable. This image has
useful image detail, which could be enhanced with judicious image
processing.
Many digital cameras display histograms for individual images. Learning
how to read the histogram gives you a lot of insight into judging the
quality of your images.
If your camera has a Program mode, it will usually allow you specify an Exposure Value (EV) compensation setting. Negative EV settings darken the image, so select larger negative values until you see limb darkening. This is a gentle gradient toward the edge of Sun's disc. If you study a few published photographs of the Sun, you'll get a good sense of how much limb darkening is reasonable. A camera with a manual mode gives you complete control of aperture, shutter speed, and ISO setting. The ISO setting simulates film speed by adjusting the sensitivity of the camera's imaging sensor. High ISO settings can greatly increase the amount of noise in the images.
Experiment with the manual settings to see what works well for you. If you find all the options a bit overwhelming, try using the Program mode to find reasonable settings to start with.
Focusing a solar image
 Focusing
a white-light solar image can be frustrating. In a well-exposed image,
the Sun's limb has a soft edge, and features on the disc are rarely
sharp. Over the day, seeing conditions are often no better than fair.
Focusing
a white-light solar image can be frustrating. In a well-exposed image,
the Sun's limb has a soft edge, and features on the disc are rarely
sharp. Over the day, seeing conditions are often no better than fair.
The small LCD screens on most digital cameras complicate matters even
more. It's hard to see much detail, and bright sunlight washes out the
image. A stamp loupe is an inexpensive way to reduce both problems.
Autofocusing can sometimes do a good job on the Sun. Look for multi-spot
focusing modes, or modes where you can manually choose a focus point in
the frame. The best focus point is usually on the Sun's limb.
Once again, experimentation is important. Shoot several series of images
in different focusing modes, including manual focusing. Check the
images on your computer screen and find the focusing technique that
works best for you.
Once you've set up your camera and found exposure and focus settings
you like, make good use of the large capacity on modern storage cards.
If your camera has a burst mode (i.e. multiple exposures from a single
shutter release), use it as much as possible. If your camera has a movie
recording mode � and most modern cameras do � try making short video
clips.
All this experimentation might seem to be a nuisance, particularly if
you're not the �gear-head� type of astronomer who loves tinkering with
equipment. Stick with it. Your efforts will pay off when you're
recording a unique event such as an eclipse or a transit.
Part 3: Processing solar images
Once you've captured your solar images, post processing can make them look their best. Don't lose sight of the most fundamental rule of image processing: you can't change a poor image into a good picture. With the exception of a few basic operations, image processing destroys image data. The goal is to extract the information you want without throwing too much data away.
Overcoming poor seeing
Astronomers always fight seeing conditions. When you're observing the
Sun, poor seeing is a common problem. Even with a fast shutter speed
setting, a single image of the Sun can look disappointingly soft. One
way to counteract seeing effects is to make multiple exposures and
combine them in a process called stacking. Seeing effects are random,
and tend to cancel out over a series of images.
Seeing is a term that describes the degree to which turbulence in our atmosphere distorts astronomical objects. The most common seeing effect is twinkling stars. On a night with excellent seeing, the stars are stable points of light. If the seeing is poor, some stars might seem to jiggle or have rapidly changing colors.
When observing the Sun, Moon, or planets, poor seeing can show up as an effect called boiling. The image appears to shimmer like a mirage over a hot roadway.
The most common technique is to make a video clip of a target and stack the video frames. You can also use an image sequence: a series of individual still frames. The intervals between still frames don't have to be uniform, but should be short.
Registax is the nearly universal software solution for stacking video frames or image sequences to produce an enhanced image. Despite being freeware, Registax is a well-respected program with a large user community.
Video vs. image sequences
Most modern digital cameras have some kind of video capture mode. Many
have burst options that allow you to take multiple still shots with a
single shutter release. For solar imaging, either mode can be useful.
Video capture is a simple procedure, but most cameras don't provide manual control of details such as aperture or effective shutter speed. Standard settings that work well for everyday scenes don't always work well with astronomical targets.
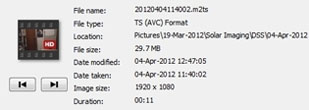
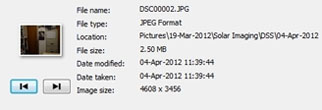
Even in HD modes, video frames have less resolution available than full-sized still images. These two property listings show the size of an HD frame and a 16 megapixel still image for the same camera. The still image has almost 8 times the pixel resolution of the video frame, and can record much smaller features in the image.
HD video frames provide adequate resolution for most solar and lunar imaging projects. In poor seeing conditions, high resolution frames might not reveal any additional details. As always, experimentation is the best way to decide what will work best for you.
For the ingress and egress phases of the transit of Venus, you might want to get image sequences at the highest possible resolution. For example, if you're interested in getting your own data on the black drop (q.v.) or the aureole effect (q.v.), every detail might be significant.
A very quick look at image processing
Image processing is a vast subject area, and the details can be
demanding. Fortunately, you can take advantage of the work of experts.
There are a lot of tools available for amateur astronomers and
photographers. Prices range from free to outrageously expensive.
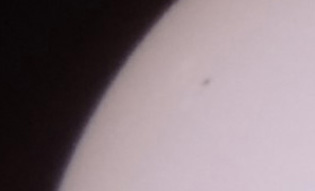
The photo on the left is an unprocessed image of the Sun, one of an image sequence of only ten exposures. I used the same digital camera and filter I'd mentioned earlier, using manual exposure settings, 30x zoom, and autofocus. The Sun's limb is ragged, and there's a lot of noise in the disc itself. The sunspot is almost lost in the noise.
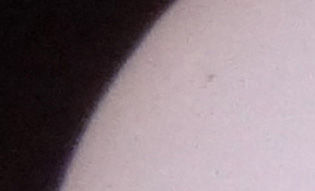
The photo on the right shows a cropped region of the image produced using Registax. Ten images is an extremely small stack, and a larger stack can give much better results. Some planetary images are produced by stacking thousands of frames. Even so, there's some improvement. The limb and sunspot, while still soft, are better defined. This process took about five minutes, and I used default settings for the stacking process.
Registax includes a wavelet processing module, which I used to produce the cropped image below. The wavelet module is interactive. A set of six sliders adjusts the degree of sharpening.
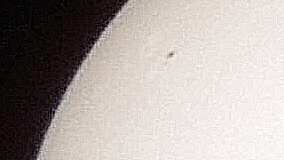 Is
this image an improvement? That's a subjective judgment. It's largely a
question of what you're trying to achieve. In this case, I was was
interested in enhancing the sunspot, and didn't mind if the limb looked a
bit ragged. I adjusted the wavelet sliders until the sunspot resembled
what I'd seen in my telescope.
Is
this image an improvement? That's a subjective judgment. It's largely a
question of what you're trying to achieve. In this case, I was was
interested in enhancing the sunspot, and didn't mind if the limb looked a
bit ragged. I adjusted the wavelet sliders until the sunspot resembled
what I'd seen in my telescope.
I must point out that a ten image stack is almost laughably small. I'd been testing many different combinations of aperture, shutter speed, and ISO setting, and recorded only a single burst for each setting. Later, I decided I'd see what I could do with such a small stack. Sometimes, you just have to make do with what you have. It's good to have a sense what you might be able to get away with.
This is a good illustration of another basic law of image processing: there are no free rides. Enhancing a feature often means degrading some other aspect of the image. Sometimes that degradation is unnoticeable, but it's there, and it might cause problems if the image is processed again.
Whenever you're processing images, make sure you work on copies. The most obvious reason is to let you recover from mistakes. If you're trying to improve your skills, expect to make plenty of mistakes. That's one of the best ways to learn. If you've kept your originals, you can always start over and reprocess them.
Keeping your untouched originals also lets you go back to re-examine them. Perhaps you got some new digital filters to try out. You might have discovered some new technique, or you might be looking at your images for other purposes. Storage isn't terribly expensive anymore, and you won't regret keeping your originals.